 Blog
 Podcast
 Ayuda
 Acceso de clientes


Cómo crear un foro en WordPress (en 6 sencillos pasos)
Are you finding it difficult to encourage visitors to engage with your website? Or maybe you’re struggling to build a thriving community of like-minded people.
Una de las formas más sencillas de resolver estos problemas es aprender a crear un foro en WordPress. Esta función permite a los usuarios hacer y responder preguntas, ayudándoles a resolver problemas más rápidamente.
What’s more, by nurturing an online community, you can build trust and increase brand loyalty through meaningful interactions. This can work especially well on membership sites, which thrive when users feel like a part of something larger.
Por último, pero no por ello menos importante, un foro puede ayudarle a mejorar la optimización para motores de búsqueda (SEO) de su sitio web. Puedes iniciar hilos con palabras clave populares que la gente utiliza para encontrar contenidos como los tuyos. Es una forma estupenda de atraer más tráfico orgánico a tus páginas.
En este artículo, analizaremos las ventajas de los foros. A continuación, le mostraremos cómo añadir un foro a WordPress, utilizando el plugin bbPress.
Manos a la obra.
Ventajas de añadir un foro a su sitio web
Un foro es una forma estupenda de hacer que su sitio web sea más interactivo. Permite a la gente hacer preguntas, publicar respuestas y conectar con otros miembros o clientes. Como resultado, puede aumentar el valor que ofrece a los visitantes y aumente su audiencia.
Además, mayores niveles de compromiso can encourage visitors to stay on your site for longer. Therefore, your forum can help you reduce bounce rates (the amount of users who leave immediately after arriving at your website) and increase Time on Site (TOS). In turn, improving these metrics is a great way to increase your site’s ranking in search engines.
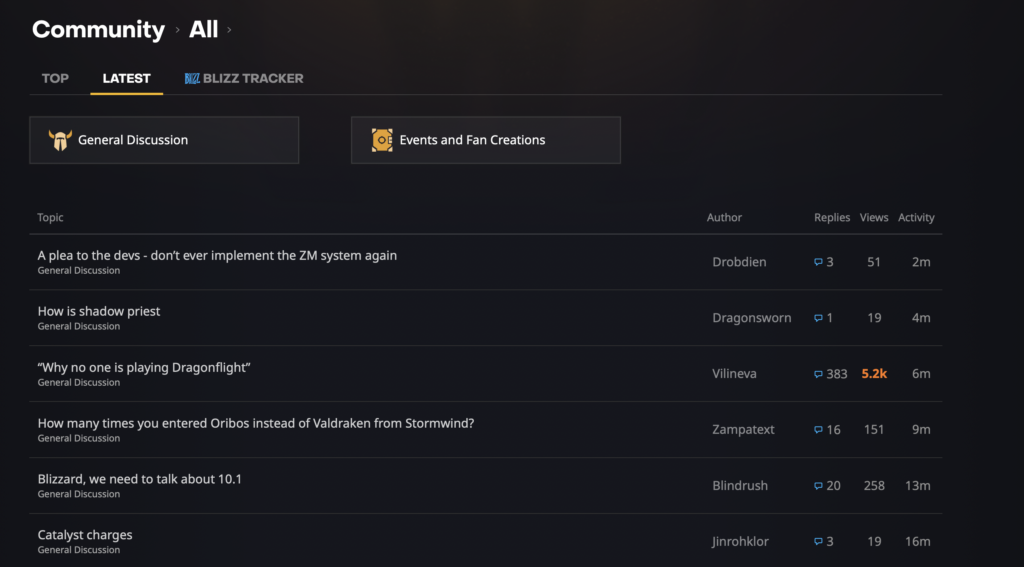
Forums can also be used to solve customer problems. This is especially useful for e-commerce sites, since it means that shoppers don’t always have to reach out via customer support channels. This saves them time, and enables you to aumentar la eficacia en toda su empresa.
What’s more, by nurturing an online community, you can build trust and aumentar la fidelidad a la marca a través de interacciones significativas. Esto puede funcionar especialmente bien en sitios de afiliaciónque prosperan cuando los usuarios se sienten parte de algo más grande.
Por último, pero no por ello menos importante, un foro puede ayudarle a mejorar la optimización para motores de búsqueda (SEO) en su sitio web. Ya hemos mencionado algunas métricas clave, pero también puede iniciar hilos que contengan palabras clave populares que la gente utiliza para encontrar contenido como el suyo. Es una forma estupenda de atraer más tráfico orgánico a sus páginas.
Una introducción a el plugin bbPress
Hay muchos formas de añadir un foro a WordPress. Puede hacerlo manualmente, pero eso requiere mucho tiempo y experiencia. Una opción más sencilla es utilizar un plugin, como bbPress:
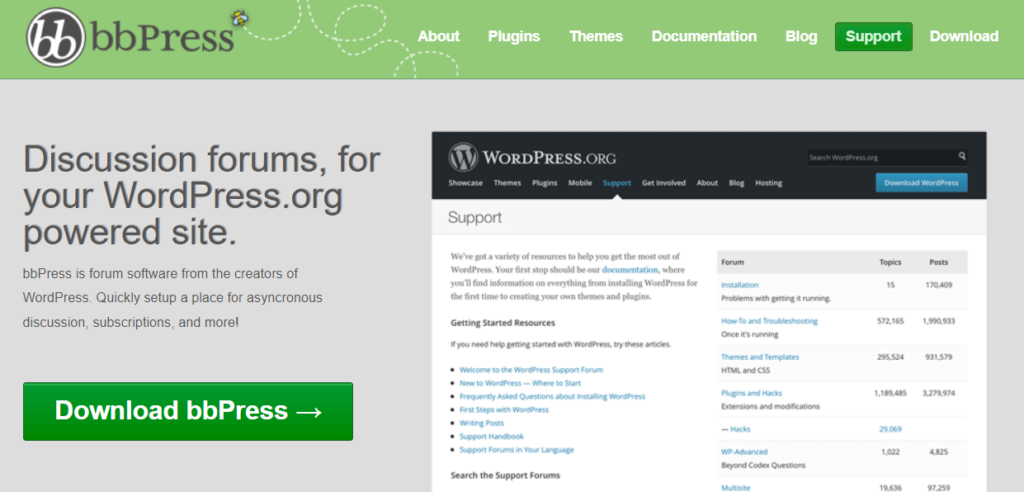
The bbPress plugin was developed by the people behind WordPress itself, so it integrates seamlessly with the core platform. It’s also very easy to use.
bbPress es de código abierto, gratuito y adecuado tanto para principiantes como para usuarios avanzados. Si desea ampliar su funcionalidad, puede elegir entre muchos complementos gratuitos y premium.
What’s more, bbPress offers a lot of high-spec features that make it a superior choice to create a forum in WordPress. For example, you can make your forums publicly accessible, or restrict them to only certain users.
If you’re running a membership site, you’ll also be happy to know that the bbPress plugin integrates seamlessly with nuestro propio plugin MemberMouse. De esta manera, puede restringir el acceso al foro sólo a aquellos con una membresía activa en su sitio. Esto es especialmente útil si ofrecer cursos (o productos similares) a determinados niveles de afiliación.
Cómo crear un foro en WordPress (en 6 pasos)
Now that you understand the benefits of using bbPress, let’s explore how to create a forum in WordPress.
Paso 1: Cree su primer foro
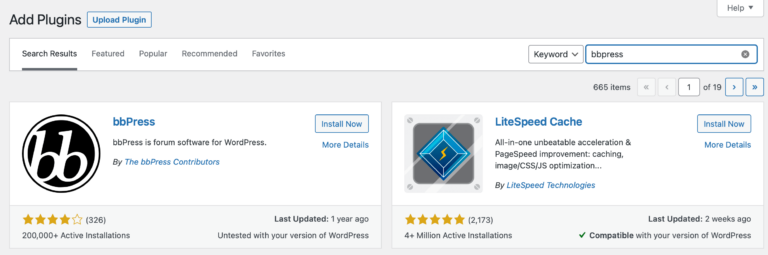
To create your first forum, you’ll need to install and activate the bbPress plugin. Fortunately, you can do this straight from your WordPress dashboard.
All you need to do is navigate to Plugins > Add New. Then, enter “bbPress” in the search bar, and hit Install Now > Activate:
At this point, navigate to Forums in your dashboard. Then, click on Add New:
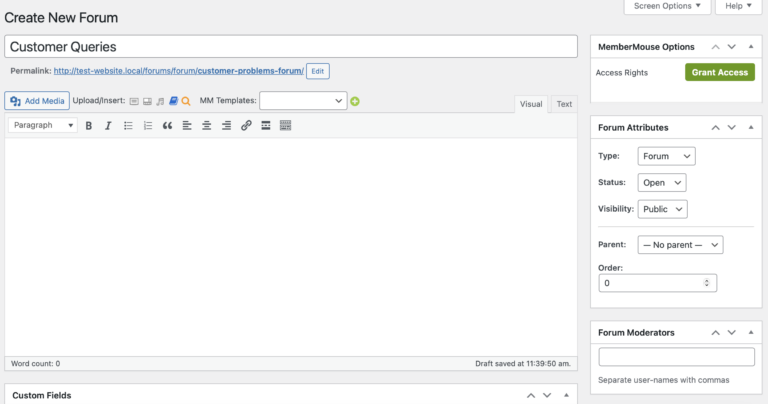
Here, type in the name of your first forum. This will be visible to anyone who uses it. Plus, the forum name will be included in the page’s URL. Therefore, it’s a good idea to consider incorporating keywords to attract more traffic.
You might also want to add a description to your forum. However, this is only really necessary if you plan to create multiple forums (and your forum names aren’t descriptive enough to differentiate between them).
If you add one, this description will be displayed on your site’s forum index page. Once you’re done here, click on Publish to save your changes so far.
Paso 2: Configure los ajustes de su foro
Now that you’ve created your first forum, let’s configure some of its key settings. For instance, you might want to add moderators.
Moderators have the power to delete comments and manage your forum. To add these users, simply enter their usernames into the Forum Moderators box.
También puedes cambiar el estado de tus foros a abierto o cerrado. A continuación, puedes ajustar aún más la configuración de visibilidad, haciendo que tus hilos sean públicos, privados u ocultos:
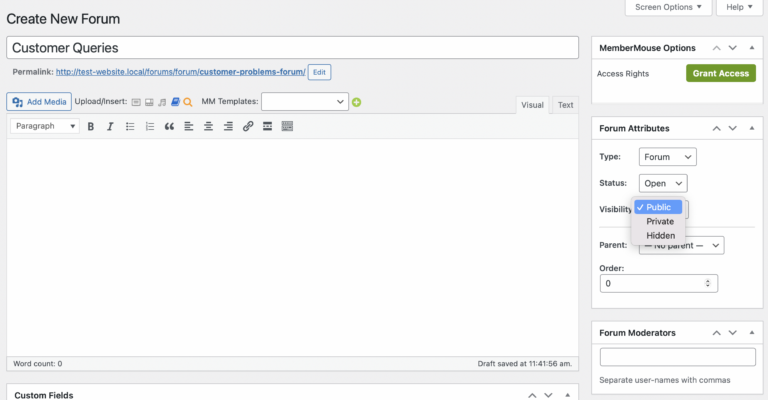
If you select Hidden, you’ll essentially return your forum to a draft status. This is handy if you need to make large-scale updates or changes, and don’t want visitors to see your work-in-progress.
By default, your forum will be a standalone ‘parent’. However, you can use the Parent drop-down menu to turn it into a ‘child’ forum:
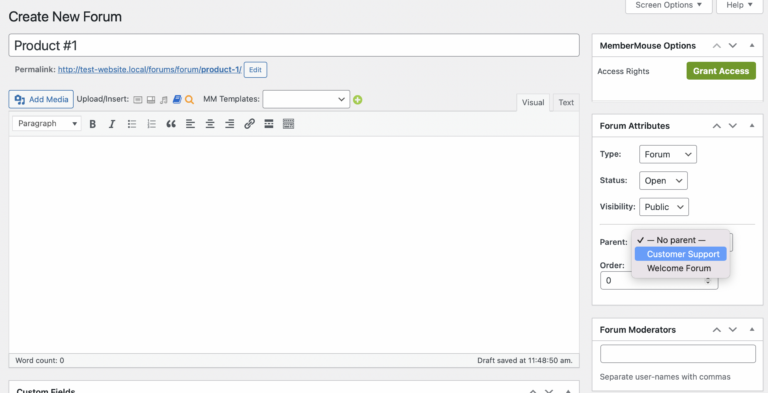
Por ejemplo, puede tener un foro principal para todas las consultas de los clientes. A continuación, puede crear foros secundarios para cada uno de sus productos. Los clientes pueden acceder a esos subforos visitando primero la categoría de nivel superior.
Don’t forget to save your changes here once you’re done. Then you can repeat these first two steps as needed to add as many forums as you want to your site.
Paso 3: Mostrar el índice del foro en WordPress
One of bbPress’ handy features is that it automatically creates a forum index, where you can view all of your created forums. You can access this index by adding “forum” to the end of your website URL:
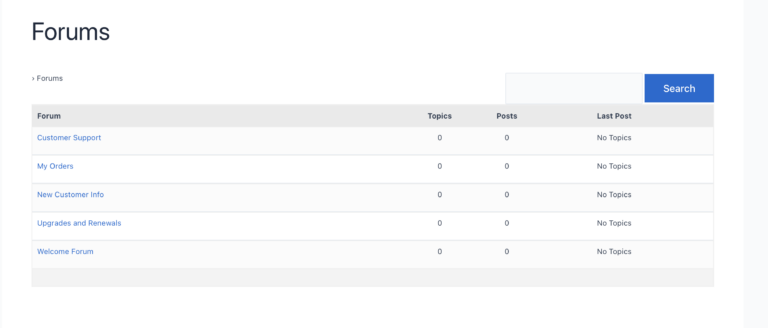
You can also change the index URL by heading to Settings > Forums. Then, locate the Forum Root:
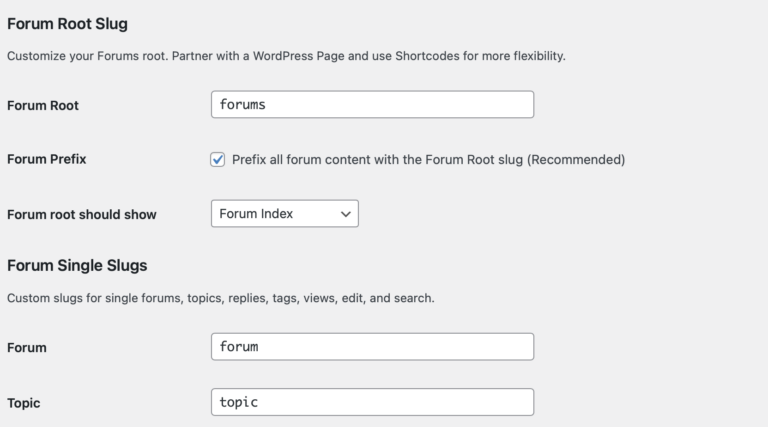
Better yet, you can add the index to any area of your site. For example, you could create a new page for the index and embed it using the following shortcode:
[bbp-forum-index]
Además, puede ser una buena idea añadir el índice de su foro a su menú de navegación. De esta forma, los visitantes podrán acceder fácilmente a sus foros.
Para ello, vaya a Apariencia > Menús y seleccione el foro como elemento de menú:
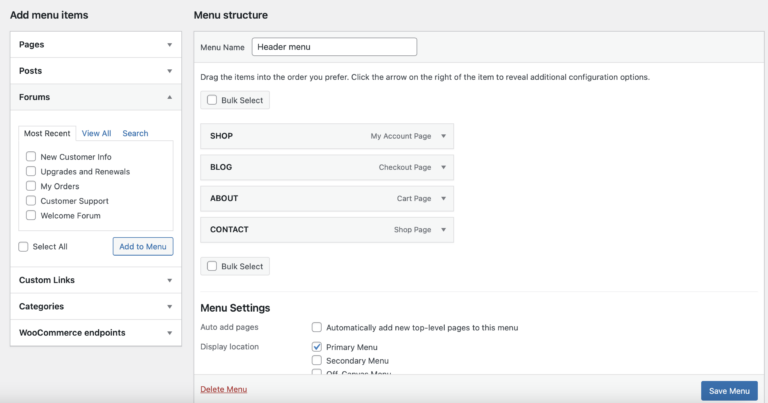
Then click on Save to update the menu. However you do it, it’s vital to make sure that your forums are simple to find and navigate.
Paso 4: Activar el registro de usuarios
Even if you’ve created a public forum, it’s a good idea to have users register in order to post comments and replies. This helps to cut down on marketing messages and other types of spam.
Therefore, you’ll need to find a way to enable user registration for your forums. The easiest way to do this is to use the built-in formulario de inscripción que ofrece bbPress.
Simplemente añada este formulario a cualquier página o entrada de su sitio utilizando el siguiente código corto:
[bbp-register]
A continuación, publica la página para que el formulario esté activo. Puedes dirigirte al front-end de tu sitio para ver cómo queda:
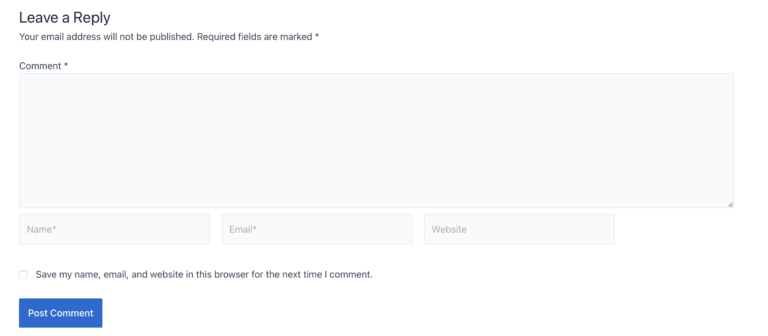
Once again, it’s important to make sure that this form is somewhere visitors can easily find it.
Paso 5: Administrar la configuración del foro bbPress
At this stage, you’ve created your first forum, altered your forum index URL, and enabled registration. However, there are some more bbPress forum settings that you may want to know about.
To access your bbPress settings, navigate to Settings in your WordPress dashboard. Then click on Forums:
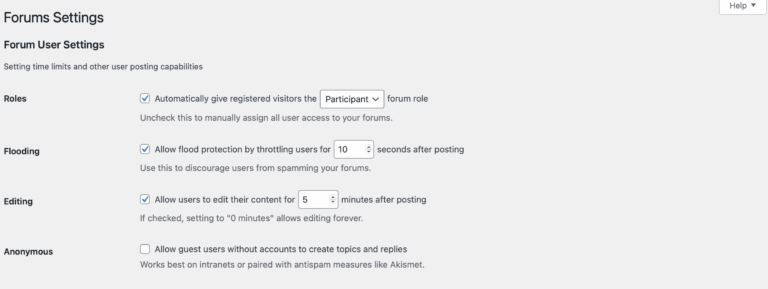
One of the more useful settings is the Flooding option. You can check this box and specify the amount of seconds between messages, in order to prevent users from spamming your forums. This is also a great way to proteja su sitio contra los robots.
Beneath this, you’ll find the Editing setting. There you can specify the window of time in which users can edit their comments.
Typically, it’s best not to allow users to continually edit threads, since that can interfere with your indexing and SEO. However, it can be a good idea to allow users to edit for five minutes or so, to fix spelling mistakes and other issues.
Additionally, you can scroll down until you see Topics and Replies Per Page. This setting enables you to limit the content that is immediately visible to the user:
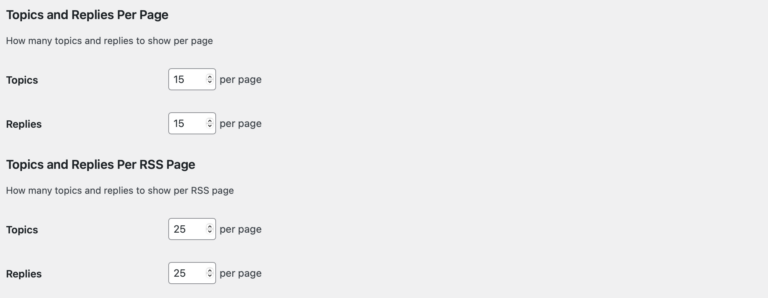
Plus, under Forum Features, you can disable Auto-embed links from sites like YouTube and Twitter. Together, these settings can optimice su sitio webya que cuanto más contenido tenga un foro, más tardará en cargarse.
Paso 6 (Opcional): Limitar el acceso al foro sólo a los miembros
Si gestiona un sitio de socios, también puede limitar el acceso al foro a sus suscriptores (o sólo a algunos de ellos). Por ejemplo, puedes ofrecer cursos online a los que tus usuarios sólo puedan acceder con un determinado nivel de suscripción.
To do that, you’d start by setting up a forum for that specific course. However, to make sure that course isn’t available to the public (or other membership options), you’ll want to restrict access to the right users.
Como ya hemos dicho, nuestro MemberMouse está diseñado para ayudarle a crear sitios de afiliación de forma rápida y sencilla:
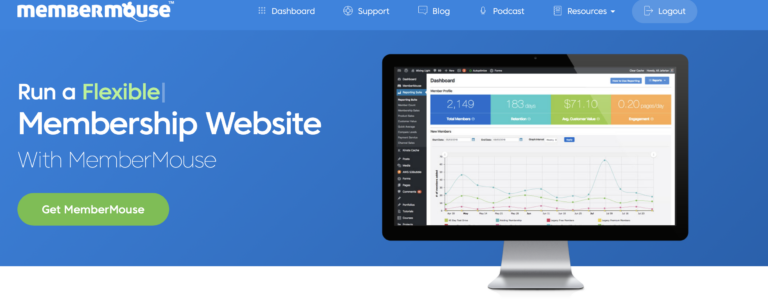
Plus, it offers a dedicated integration with bbPress. Let’s take a look at how that integration works.
Cómo limitar el acceso al foro con MemberMouse y bbPress
If you haven’t created your membership levels yet, you can do this by going to MemberMouse > Product Settings. Then switch to Membership Levels:
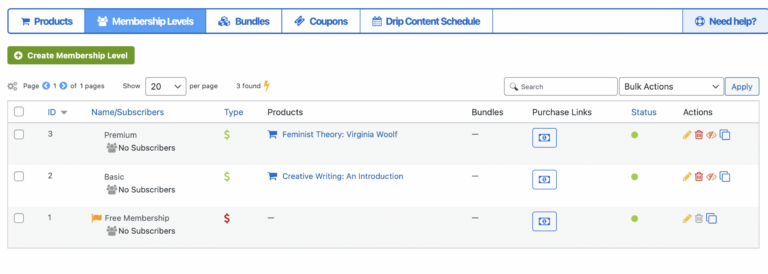
You’ll also need to add some products to MemberMouse in the Products tab. Then you can configure your membership levels so they provide access specific products like online courses.
For our example, we’ve created a product called Creative Writing: An Introduction. Only members with a Basic plan should be able to access this course. Therefore, when we set up a forum for the course, we need to restrict access to Basic members only.
This can be achieved by heading back to Forums in your dashboard. Then create a new forum or open an existing one for editing.
On the left side of the screen, you’ll see MemberMouse options. Click on Grant Access.
Puede elegir conceder acceso en función del nivel de afiliación o del paquete. Si selecciona Nivel de afiliación, puede seleccionar los planes específicos que proporcionarán acceso al foro:
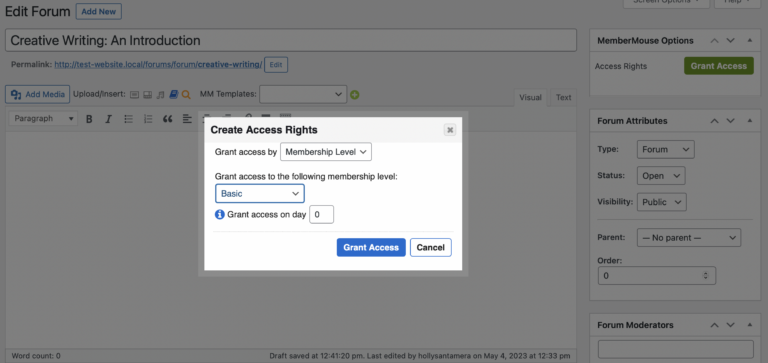
Además, puede determinar el día en que los suscriptores pueden acceder al curso. A continuación, seleccione Conceder acceso.
Para asegurarse de que la protección MemberMouse se ha aplicado correctamente, puede iniciar su sitio en una nueva ventana:
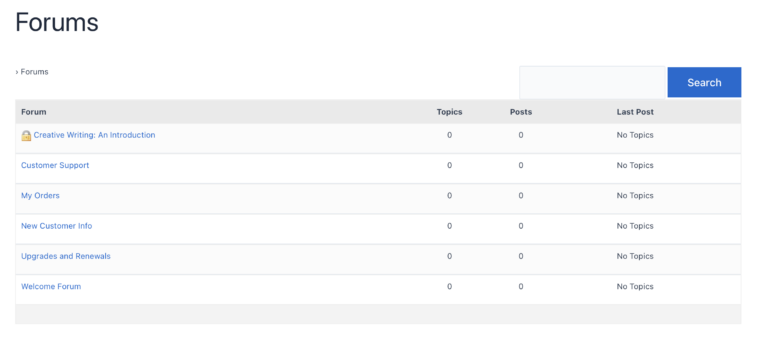
Debería aparecer un icono de candado junto al foro protegido. Tu foro está ahora protegido y restringido únicamente a los miembros que tú quieras que accedan a él.
Conclusión
Forums are a great way to boost engagement and build brand loyalty. Plus, they make it easy for members to solve problems and connect with others in the same community. Best of all, it’s simple to create a forum in WordPress using the right tools.
To recap, here’s how to add a forum to WordPress:
- Cree su primer foro con bbPress.
- Configura los ajustes de tu foro.
- Muestra el índice de tu foro en WordPress.
- Activar el registro de usuarios.
- Administrar la configuración del foro bbPress.
- Opcionalmente, limite el acceso al foro sólo a los miembros con MemberMouse.
¿Tienes alguna pregunta sobre cómo crear un foro en WordPress? ¡Háganoslo saber en la sección de comentarios a continuación!
Si te ha gustado este artículo, no dejes de seguirnos en Facebook, Twitter, Pinteresty LinkedIn! And don’t forget to subscribe in the box below.






 ES
 EN
 DE
 FR
 PT


