How to Create a Forum in WordPress (In 6 Easy Steps)
Are you finding it difficult to encourage visitors to engage with your website? Or maybe you're struggling to build a thriving community of like-minded people.
One of the easiest ways to solve these problems is by learning how to create a forum in WordPress. This feature enables users to ask and answer questions, helping them resolve issues more quickly.
What's more, by nurturing an online community, you can build trust and increase brand loyalty through meaningful interactions. This can work especially well on membership sites, which thrive when users feel like a part of something larger.
Last but not least, a forum can help you improve search engine optimization (SEO) on your website. You can start threads containing popular keywords that people use to find content like yours. This is a great way to drive more organic traffic to your pages.
In this post, we’ll take a closer look at the benefits of forums. Then we’ll show you how to add a forum to WordPress, using the bbPress plugin.
Let’s get to it!
The Benefits of Adding a Forum to Your Website
A forum is a great way to make your website more interactive. It enables people to ask questions, post replies, and connect with other members or customers. As a result, you can increase the value you provide to visitors and grow your audience.
Additionally, higher engagement levels can encourage visitors to stay on your site for longer. Therefore, your forum can help you reduce bounce rates (the amount of users who leave immediately after arriving at your website) and increase Time on Site (TOS). In turn, improving these metrics is a great way to increase your site's ranking in search engines.
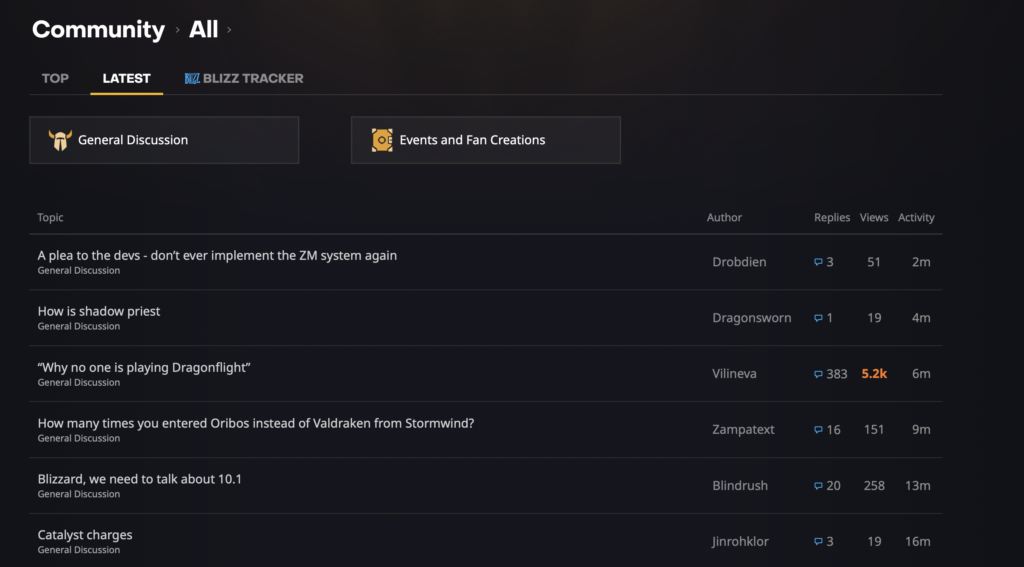
Forums can also be used to solve customer problems. This is especially useful for e-commerce sites, since it means that shoppers don't always have to reach out via customer support channels. This saves them time, and enables you to increase efficiency across your business.
What's more, by nurturing an online community, you can build trust and increase brand loyalty through meaningful interactions. This can work especially well on membership sites, which thrive when users feel like a part of something larger.
Last but not least, a forum can help you improve search engine optimization (SEO) on your website. We already mentioned a few key metrics, but you can also start threads containing popular keywords that people use to find content like yours. This is a great way to drive more organic traffic to your pages.
An Introduction to the bbPress Plugin
There are many ways to add a forum to WordPress. You can do so manually, but that takes a lot of time and expertise. A simpler option is to use a plugin, such as bbPress:
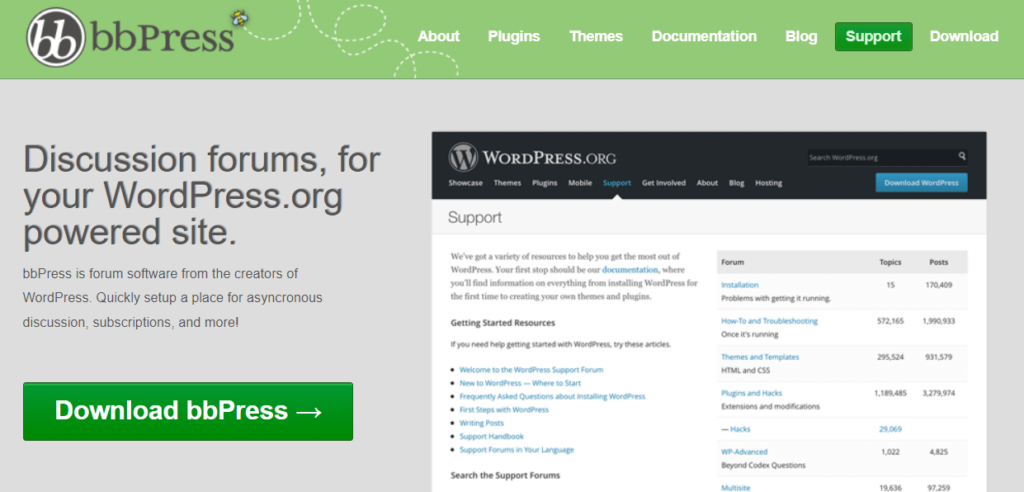
The bbPress plugin was developed by the people behind WordPress itself, so it integrates seamlessly with the core platform. It's also very easy to use.
bbPress is open-source, free, and suitable for beginners and advanced users alike. If you want to extend its functionality, you can choose between many free and premium add-ons.
What's more, bbPress offers a lot of high-spec features that make it a superior choice to create a forum in WordPress. For example, you can make your forums publicly accessible, or restrict them to only certain users.
If you're running a membership site, you'll also be happy to know that the bbPress plugin integrates seamlessly with our own MemberMouse plugin. This way, you can restrict forum access to only those with an active membership on your site. This is particularly useful if you offer courses (or similar products) to specific membership levels.
How To Create a Forum in WordPress (In 6 Steps)
Now that you understand the benefits of using bbPress, let's explore how to create a forum in WordPress.
Step 1: Create Your First Forum
To create your first forum, you'll need to install and activate the bbPress plugin. Fortunately, you can do this straight from your WordPress dashboard.
All you need to do is navigate to Plugins > Add New. Then, enter “bbPress” in the search bar, and hit Install Now > Activate:

At this point, navigate to Forums in your dashboard. Then, click on Add New:
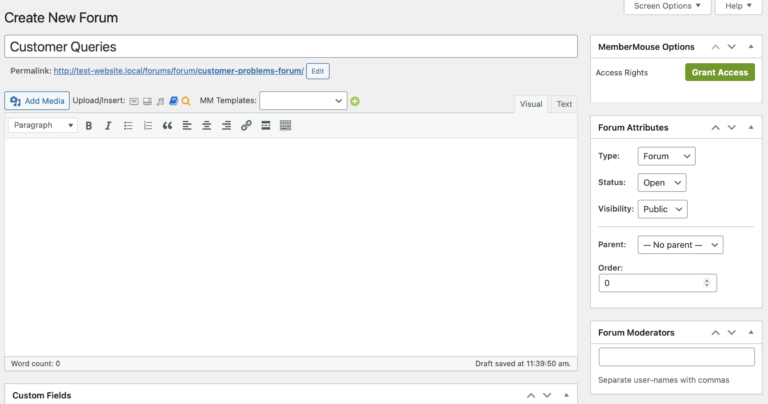
Here, type in the name of your first forum. This will be visible to anyone who uses it. Plus, the forum name will be included in the page's URL. Therefore, it's a good idea to consider incorporating keywords to attract more traffic.
You might also want to add a description to your forum. However, this is only really necessary if you plan to create multiple forums (and your forum names aren't descriptive enough to differentiate between them).
If you add one, this description will be displayed on your site's forum index page. Once you're done here, click on Publish to save your changes so far.
Step 2: Configure Your Forum Settings
Now that you've created your first forum, let's configure some of its key settings. For instance, you might want to add moderators.
Moderators have the power to delete comments and manage your forum. To add these users, simply enter their usernames into the Forum Moderators box.
Alternatively, you can change the status of your forums to open or closed. Then you can further adjust the visibility settings, making your threads public, private, or hidden:
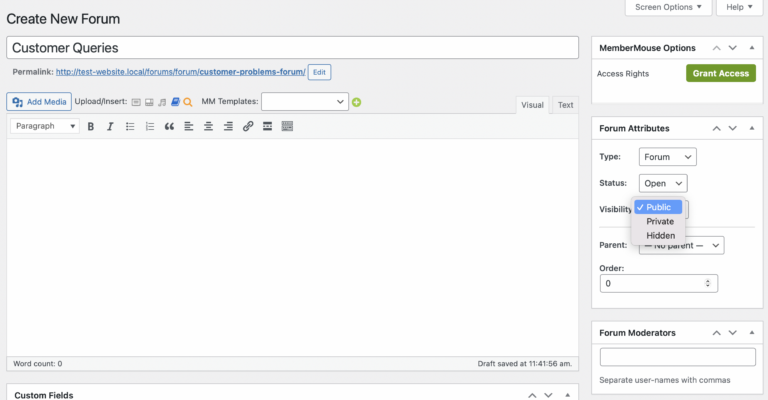
If you select Hidden, you'll essentially return your forum to a draft status. This is handy if you need to make large-scale updates or changes, and don't want visitors to see your work-in-progress.
By default, your forum will be a standalone ‘parent'. However, you can use the Parent drop-down menu to turn it into a ‘child' forum:
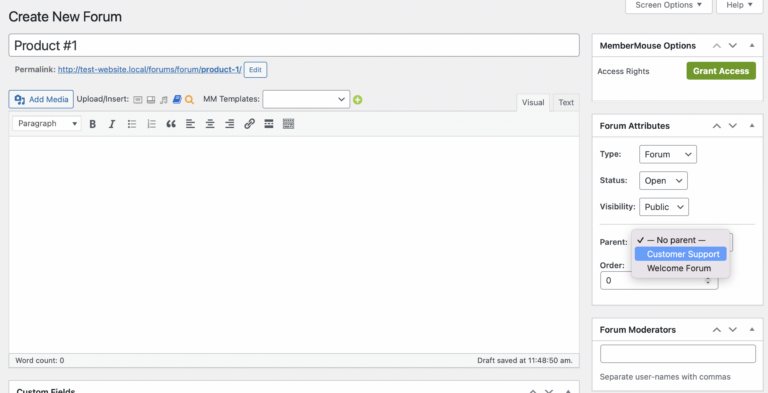
For example, you might have a parent forum for all customer queries. Then you can set up separate child forums for each of your products. Customers can access those sub-forums by visiting the top-level category first.
Don't forget to save your changes here once you're done. Then you can repeat these first two steps as needed to add as many forums as you want to your site.
Step 3: Display Your Forum Index in WordPress
One of bbPress' handy features is that it automatically creates a forum index, where you can view all of your created forums. You can access this index by adding “forum” to the end of your website URL:
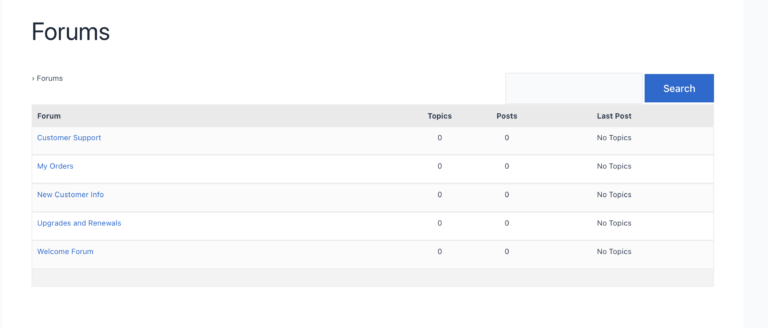
You can also change the index URL by heading to Settings > Forums. Then, locate the Forum Root:
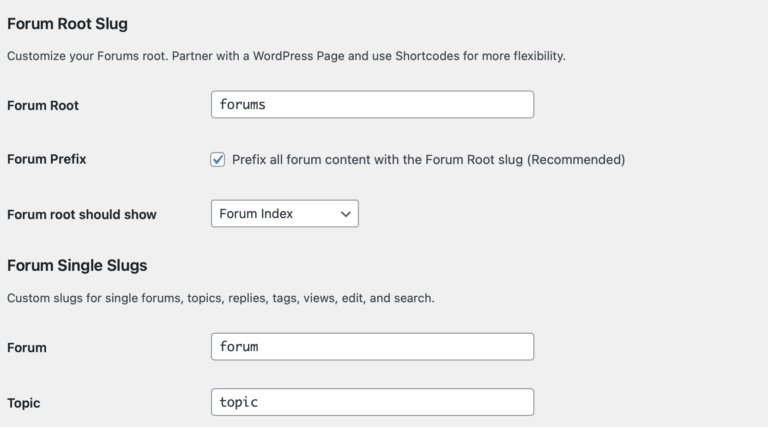
Better yet, you can add the index to any area of your site. For example, you could create a new page for the index and embed it using the following shortcode:
[bbp-forum-index]
Additionally, it can be a good idea to add your forum index to your navigation menu. This way, visitors can easily access your forums.
To do this, go to Appearance > Menus and select the forum as a menu item:
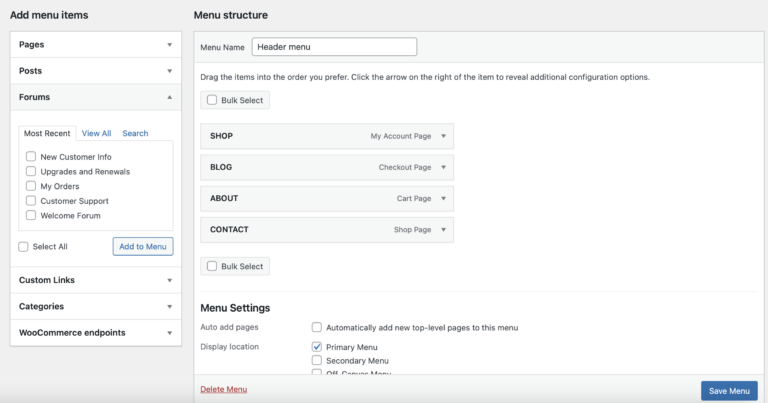
Then click on Save to update the menu. However you do it, it's vital to make sure that your forums are simple to find and navigate.
Step 4: Enable User Registration
Even if you’ve created a public forum, it's a good idea to have users register in order to post comments and replies. This helps to cut down on marketing messages and other types of spam.
Therefore, you'll need to find a way to enable user registration for your forums. The easiest way to do this is to use the built-in registration form that bbPress provides.
Simply add this form to any page or post on your site using the following shortcode:
[bbp-register]
Then publish the page to make the form live. You can head over to the front end of your site to see how it looks:
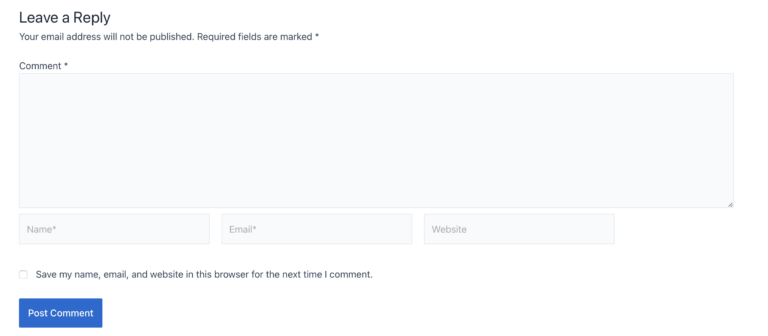
Once again, it's important to make sure that this form is somewhere visitors can easily find it.
Step 5: Manage the bbPress Forum Settings
At this stage, you've created your first forum, altered your forum index URL, and enabled registration. However, there are some more bbPress forum settings that you may want to know about.
To access your bbPress settings, navigate to Settings in your WordPress dashboard. Then click on Forums:
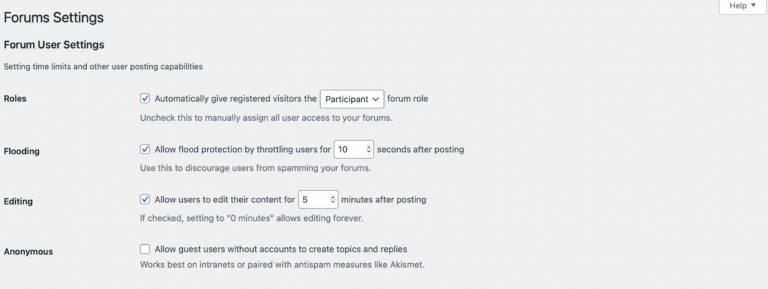
One of the more useful settings is the Flooding option. You can check this box and specify the amount of seconds between messages, in order to prevent users from spamming your forums. This is also a great way to protect your site against bots.
Beneath this, you'll find the Editing setting. There you can specify the window of time in which users can edit their comments.
Typically, it's best not to allow users to continually edit threads, since that can interfere with your indexing and SEO. However, it can be a good idea to allow users to edit for five minutes or so, to fix spelling mistakes and other issues.
Additionally, you can scroll down until you see Topics and Replies Per Page. This setting enables you to limit the content that is immediately visible to the user:

Plus, under Forum Features, you can disable Auto-embed links from sites like YouTube and Twitter. Together, these settings can optimize your site, since the more content a forum contains, the longer it takes to load.
Step 6 (Optional): Limit Forum Access to Members Only
If you run a membership site, you can also limit forum access to your subscribers (or only some of them). For example, you might offer online courses that your users can only access with a certain membership level.
To do that, you'd start by setting up a forum for that specific course. However, to make sure that course isn't available to the public (or other membership options), you'll want to restrict access to the right users.
As we mentioned earlier, our own MemberMouse plugin is designed to help you build membership sites quickly and easily:

Plus, it offers a dedicated integration with bbPress. Let's take a look at how that integration works.
How To Limit Forum Access with MemberMouse and bbPress
If you haven't created your membership levels yet, you can do this by going to MemberMouse > Product Settings. Then switch to Membership Levels:
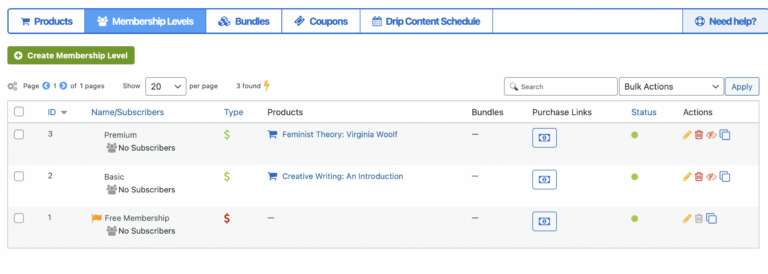
You'll also need to add some products to MemberMouse in the Products tab. Then you can configure your membership levels so they provide access specific products like online courses.
For our example, we've created a product called Creative Writing: An Introduction. Only members with a Basic plan should be able to access this course. Therefore, when we set up a forum for the course, we need to restrict access to Basic members only.
This can be achieved by heading back to Forums in your dashboard. Then create a new forum or open an existing one for editing.
On the left side of the screen, you'll see MemberMouse options. Click on Grant Access.
You can choose to grant access based on membership level or bundle. If you select Membership Level, you can select the specific plans that will provide access to the forum:
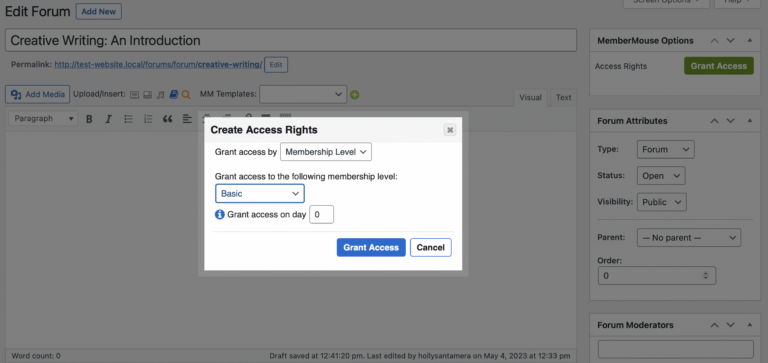
Plus, you can determine on which day of the membership subscribers can access the course. Then choose Grant Access.
To make sure the MemberMouse protection has been applied successfully, you can launch your site in a new window:
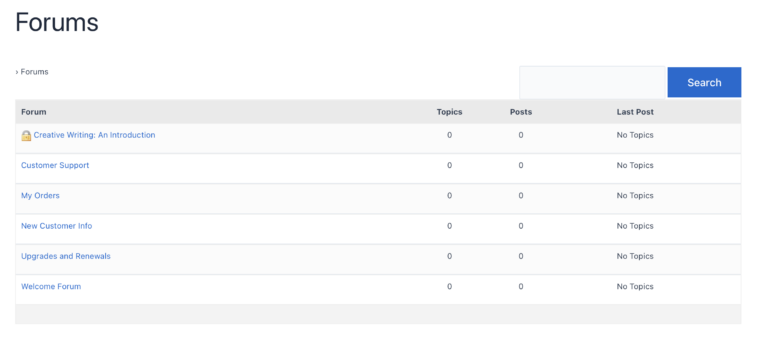
You should see a lock icon appear beside the protected forum. Your forum is now protected and restricted to only the members you want accessing it.
Conclusion
Forums are a great way to boost engagement and build brand loyalty. Plus, they make it easy for members to solve problems and connect with others in the same community. Best of all, it's simple to create a forum in WordPress using the right tools.
To recap, here's how to add a forum to WordPress:
- Create your first forum with bbPress.
- Configure your forum settings.
- Display your forum index in WordPress.
- Enable user registration.
- Manage the bbPress forum settings.
- Optionally, limit forum access to members only with MemberMouse.
Do you have any questions about how to create a forum in WordPress? Let us know in the comments section below!
If you liked this article, be sure to follow us on Facebook, Twitter, Pinterest, and LinkedIn! And don't forget to subscribe in the box below.
 Blog
Blog Podcast
 Support
 Customer Login


