The MemberMouse Google login extension will allow your users to create a new free membership using their Google login credentials.
Please note that these instructions can require a different order for some or look different than shown. The developer interface changes regularly, and each account will have verification requirements that may not be covered in this article.
Creating a Google App
The first step to enabling the Google login extension on your site is to create a Google App. To create your app, follow these steps:
- First, you need to create a project. To access the Google developers page, visit https://console.developers.google.com/project. If you have previously created Google applications, you will see them here.
Click Create Project.
- You will have to fill out some information about your new project:

Once you click ‘Create' then you will be taken inside the IAM and Admin for your project. - Click the three bar navigation menu on the top left, then click Credentials under APIs & Services.

- Click Create Credentials and OAuth client ID:

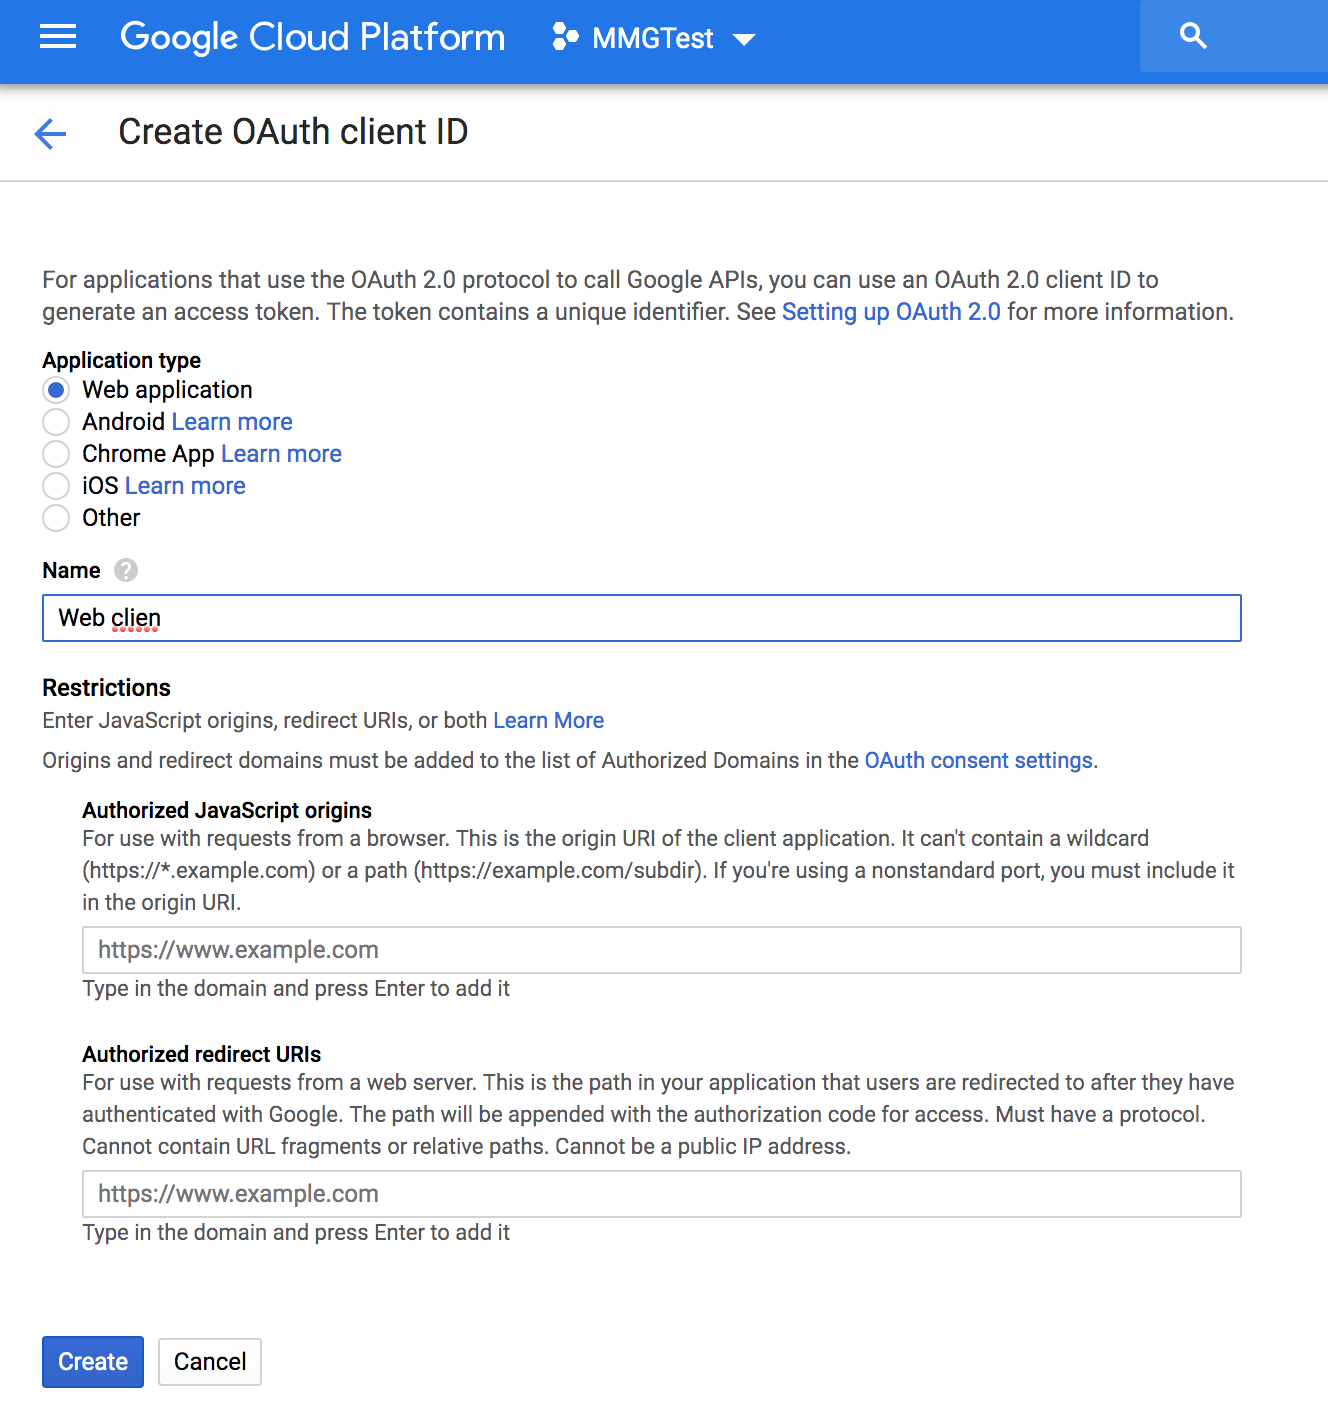
- The second Credentials section will load:

Authorized Javascript Origins: This is your base site URL (as used in your MemberMouse license)
Authorized Redirect URL: This is the URL you see on the MemberMouse Google configuration screen:https://yoursite.com/wp-content/plugins/membermouse/lib/hybridauth/?hauth.done=Google
During the setup process, it may ask you to go to an additional configuration screen to set your name, and authorized domain:
Email Address: This is the address of the gmail account you are using
Product name shown to users: Usually this is your website name. This is what Google will list on the access request for the user to confirm.
Homepage URL: This will be your website homepage, it is optional
Product Logo: Your logo is optional, but it will appear on the request
Privacy Policy URL: This is optional
Terms of service URL: Also optional - Once you have completed the OAuth Client ID screen, click Create. Your client ID and secret will be displayed.

- Open up a new tab on your web browser, and move to configuring the Google Login Extension.
Configuring the Google Login Extension
To enable the Google login extension, follow the steps below:
- In the MemberMouse menu, click on General Settings.
- Next, click on the Extensions tab and from the following page, click on the Google logo.
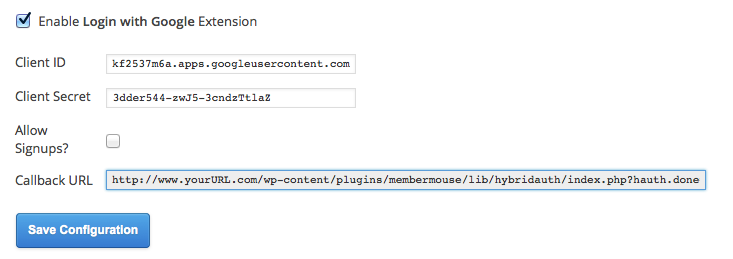
- You will need to provide some information from your Google app, as well as make a few selections:

Client ID – From your Google project dashboard.
App Secret – From your Google project dashboard.
Allow Signups? – If you want to allow new customers to sign up using their Google login credentials, then click this box. Otherwise, members will only be able to login using their Google credentials, but not sign up for a new membership.
Membership Level – Customers can only signup for a free membership level when they are using their Google login credentials. Once they are members, they can purchase a paid membership. You need to select the default free membership you would like customers to join when using Google.
Callback URL: – This is the URL that is used in the Google project in the steps above. - Click Save Configuration.
Adding Google Signup and Login to Your Site

Once you have configured your site to accept Google login, you need to add the following SmartTags to allow for signup and login:
Signup Button SmartTag™
The following SmartTag™ generates a button that customers can use to sign up for a new account:[MM_Social_Signup_Button provider='Google']
Attributes:
provider – Set the provider attribute to ‘all' to generate signup buttons for all active social login providers, or you can use an individual tag for each provider Twitter, Facebook and Google. For example:[MM_Social_Signup_Button provider='all']
Optional Attributes:
membershipLevel – You can optionally use this attribute to override the default signup membership level defined above. It takes a membership level ID for free membership levels only. For example:[MM_Social_Signup_Button provider='Google' membershipLevel='2']
Read this article to learn how to find your membership level IDs.
Login Button SmartTag™
The following SmartTag™ generates a button that customers can use to log into an existing account:
[MM_Social_Login_Button provider='Google']
Attributes:
provider – Set the provider attribute to ‘all' to generate signup buttons for all active social login providers, or you can use an individual tag for each provider Twitter, Facebook and Google. For example:[MM_Social_Login_Button provider='all']
Troubleshooting
In some systems the standard callback URL will return the following error when attempting to use the login:
This means that the URL listed is not configured with Google as an authorized redirect URI.
To fix this, go to the Google Developers Console, click APIS & AUTH > Credentials and then make sure that the URI in the error message above is pasted in the Redirect URIs area on this page. The URI Google is referring to in the error message needs to be included here exactly as it appears in the error message.
 Blog
Blog Podcast
 Support
 Customer Login


