How Can I Create A 2-Step Checkout? Two Elegant Methods Revealed
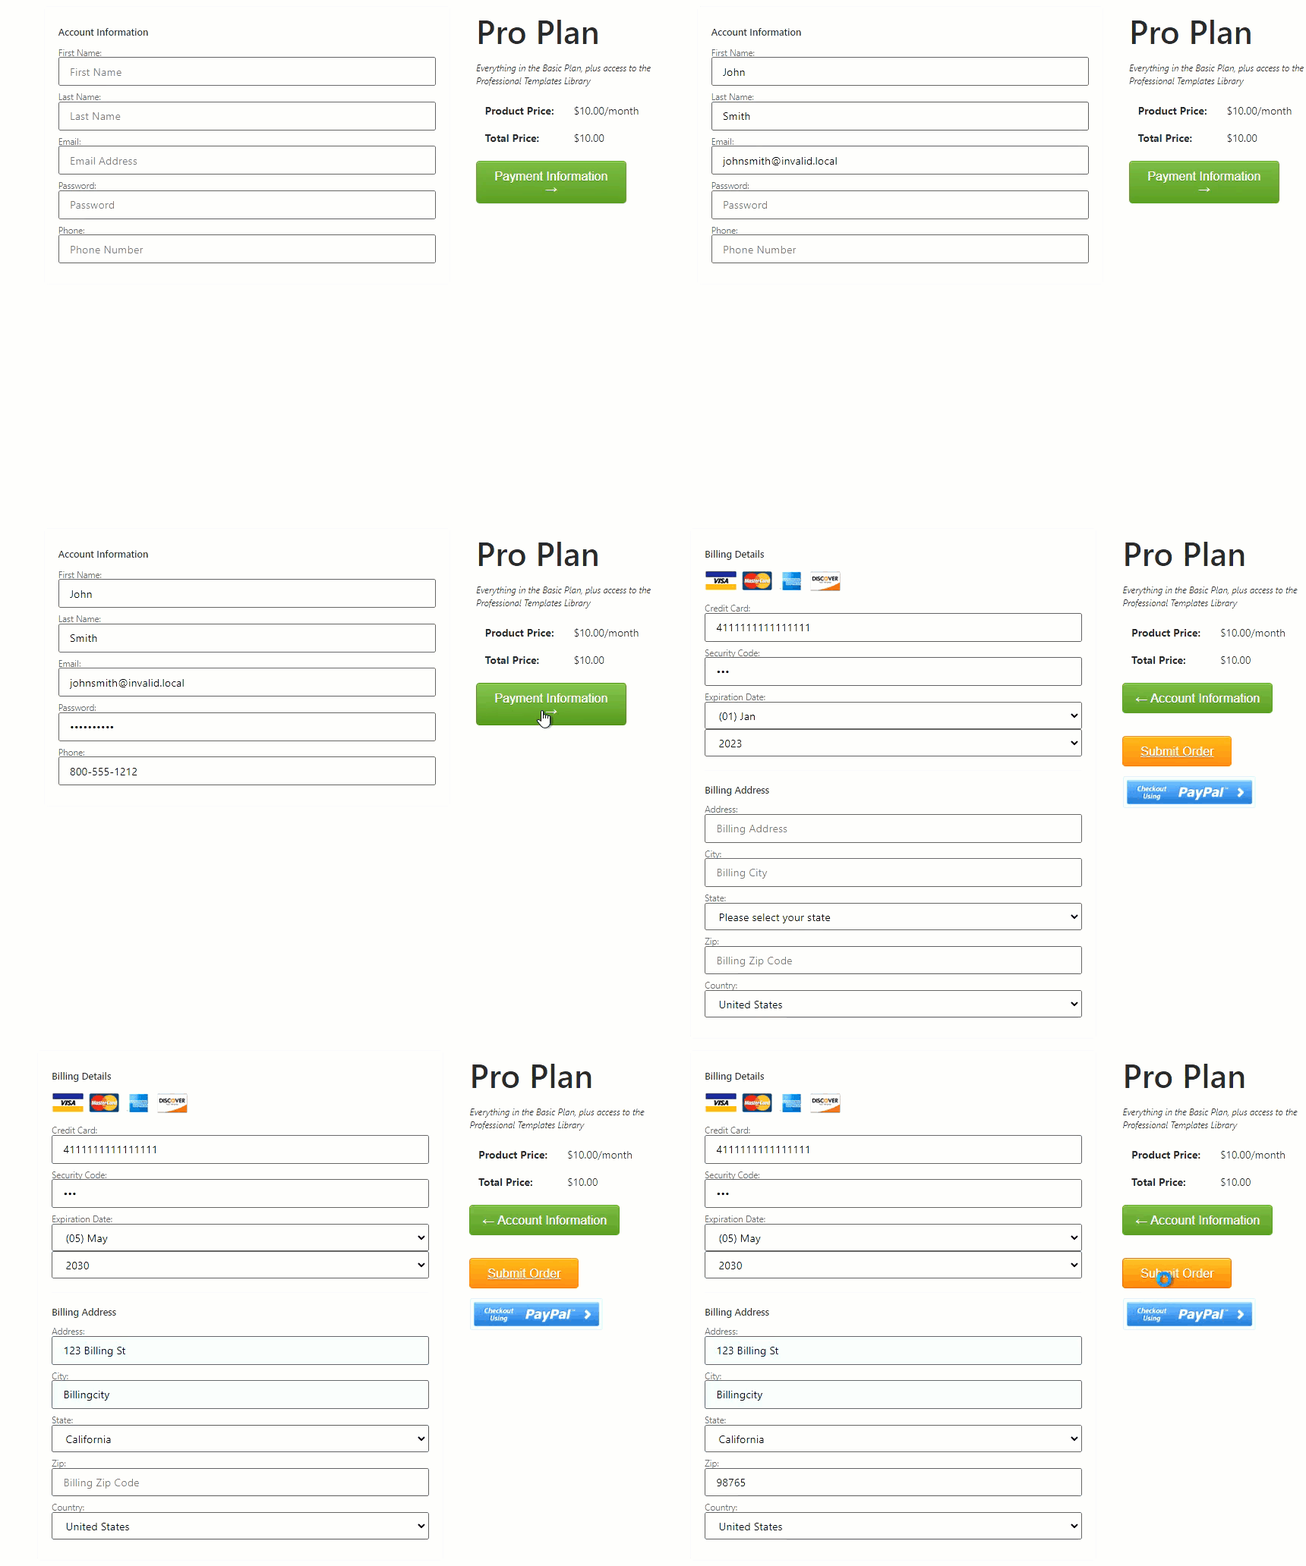
In this installment from the HelpDesk, one of our team members reveals an elegant method to create a two-step checkout. First, he explains one way that creates two separate pages, as most 2-step checkout processes do. Then, he also shows a method for showing only the account details information form first, and then the payment information as a second, separate step, but on the same page. Please note that this second option does involve HTML and some basic scripting.
Curious about Checkouts asked:
“I was wondering if there is an easy way to separate the core checkout page into two separate pages. I want to have a page that asks for customer account info (name, email, etc..) , and then go to a page to enter payment info after their account is created.”
John from MemberMouse replied:
“There are two approaches to this. The first one works exactly as you described, where there are two independent checkout pages in series. We have a detailed description of how to build this process in our support article Create a 2-Step Checkout. I'll include the essentials below too.
The first step is to create a new page for the first checkout step, and place a Free Membership Signup Form on the page.
Next, you create a Product Specific Confirmation Page for Free Memberships, and on this confirmation page you place a copy of the Checkout Core Page Template code, modifying the Form SmartTag slightly so that a specific product is offered. Since anyone who reaches this page is a logged-in member, the Account Details section of the checkout is automatically hidden, and we don't prompt for that information again. At this point, the member would be able to fill out payment information and finish the checkout process.
The main drawback of this approach is that it can be difficult to provide two-step checkout for multiple products on the same site. All members who sign up on the free membership level we created will be offered the product we specified. To offer multiple products this way, one option would be to place a Product Switch on the second step of the checkout. Alternatively, you would need a separate free membership level for each product you sold, and a Member Decision SmartTag to switch between the checkout code for each one at the second step.
The second approach is to fake two pages using scripting. With this method, there aren't really two pages, and members are not really created until they complete the entire process. Instead, you're just hiding and showing sections of the page, and providing buttons to advance through them. This creates the experience of two-step checkout without an intermediary free membership being created.
This is more like an intermediate-level page-building activity, but if you're interested and somewhat comfortable with HTML and basic scripts, you can follow the demonstration implementation below to see how it can be done.
Elegant 2-Step Checkout Demonstration
First, take a look at the Checkout Page Template and you'll see that all the different sections are already laid out as <div> blocks and our section auto-hiding is a separate system that surrounds them, so that's really convenient for us. We'll start by opening the checkout page in the editor and viewing it as HTML.
The first change we need to make is to add some CSS so that when the page loads it will be in the desired configuration. There's a bunch of different ways to do this, ultimately it might be better to have it in your theme's Additional CSS section, but for now we'll just add some code to the very top of the checkout page:
<style>
#mm-billing-information-section, #mm-shipping-information-section,
#mm-coupon-block, .mm-purchaseSection, #page-nav-back {display: none;}
</style>
Just underneath that, we'll add some scripting for our functions that show and hide the pages:
<script>
function showPageOne() {
  jQuery( ".mm-purchaseSection" ).hide();
  jQuery( "#mm-account-information-section" ).show();
  jQuery( "#mm-billing-information-section" ).hide();
  jQuery( "#mm-shipping-information-section" ).hide();
  jQuery( "#mm-coupon-block" ).hide();
  jQuery( "#page-nav-back" ).hide();
  jQuery( "#page-nav-forward" ).show();
}

function showPageTwo() {
  jQuery( ".mm-purchaseSection" ).show();
  jQuery( "#mm-account-information-section" ).hide();
  jQuery( "#mm-billing-information-section" ).show();
  jQuery( "#mm-shipping-information-section" ).show();
  jQuery( "#mm-coupon-block" ).show();
  jQuery( "#page-nav-forward" ).hide();
  jQuery( "#page-nav-back" ).show();
}
</script>
Now we need to create our page navigation buttons, and the associated click handlers. I've elected to put those in the right column, I'm not sure that this is the very best layout decision, and I just borrowed some MemberMouse button styling, but you can change these things around as you prefer. In the Checkout Core Page Template this would be inserted between line 144 and 145, so just above the <div class=”mm-purchaseSection”> tag:
<div id="page-nav-forward">
<div id="page-nav-forward-button" class="mm-button large green" style="width:220px; text-align:center;">
Payment Information →</div>
</div>
<div id="page-nav-back">
<div id="page-nav-back-button" class="mm-button large green" style="width:220px; text-align:center;">
← Account Information</div>
<p> </p>
</div>

<script>
jQuery( "#page-nav-forward-button" ).click(function() {
  showPageTwo();
});
jQuery( "#page-nav-back-button" ).click(function() {
  showPageOne();
});
</script>
You can certainly use your own buttons or images, they just need to have the correct IDs so that the script can pick them up.
Give this a try and please let me know if you have any questions.
Curious about Checkouts replied:
“This resolved my issue. Thanks so much for taking the time to give me a detailed response with all the information I needed!”
Cynthia Thoennessen
Cynthia is the Head of Customer Experience for MemberMouse.
 Blog
Blog Podcast
 Support
 Customer Login


