The MemberMouse MailChimp integration will allow you to easily assign and move your customers to and from MailChimp Lists, which they call an Audience.
As of MM 2.4.1+ MailChimp Tags support available using Bundles, as well as moving members between Audiences.
Create an API Key in MailChimp
- Log in to your MailChimp account.
- Click on your account avatar in the left-hand side navigation bar at the bottom left corner and then click the Account item.

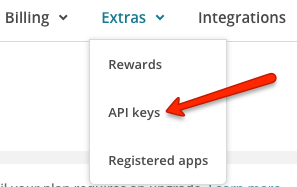
- In the Extras menu click on the API keys item.

- After clicking the API Keys & Authorized Apps link, you will be presented with any current keys you have for your account along with the ability of generating new keys.

- MemberMouse will need its own API Key for the integration. Click the Create A Key button and follow the instructions to create a new key.
- After the key has been created, copy the key listed in the API Key column. You will paste this key into a field on your site in the next step.
Integrate MailChimp with MemberMouse
- In the MemberMouse menu, click Email Settings and then click on the Email Integrations tab.
- Choose ‘MailChimp' from the Select Provider dropdown menu.
![[DELETED CONTENT] Growing to 11,000 Members | MemberMouse](https://storage.googleapis.com/wpgcbucket/wp/2023/08/5bec7267-j5axd68qol9kakkvpedzyci1hkgs1aecra.png)
- Enter the API Key that was retrieved from the MailChimp website.
![[DELETED CONTENT] Sales Process Optimization | MemberMouse](https://storage.googleapis.com/wpgcbucket/wp/2023/08/4fd1ffc6-screen-shot-2023-09-13-at-3.10.12-pm.png)
- Choose your desired Confirmed Opt-In settings.
![[DELETED CONTENT] Growing Beyond 5 Figures A Month | MemberMouse](https://storage.googleapis.com/wpgcbucket/wp/2023/08/36058782-xbbpf_t40wbq_exb5nryzkiforngpucbuw.png)
- Click Configure to save your settings.
More about Confirmed Opt-In Settings
(Note: MemberMouse settings for the opt-in configuration will overwrite any opt-in settings configured in MailChimp)
The MailChimp integration includes 3 different options for your MailChimp Opt-In settings.
- Never – This option will not require your users to opt-in to lists.
- First List Only – This option will only require users to confirm the first time they are added to an Audience list.
- Before Every List Move – This option will require your users to opt-in to each Audience list MemberMouse attempts to transition them to.
MemberMouse utilizes the MailChimp API to automatically add and move members between Audience lists based on their access rights. You can choose to enable the Confirmed Opt-in feature for your lists using the MemberMouse integration options mentioned above.
When the opt-in feature is enabled for your MailChimp Audience lists (MailChimp refers to this as Double Opt-in), depending on your chosen settings, the member will receive an email from MailChimp when they're added to either their first Audience list or, if configured, every Audience list, asking them to click a link to confirm they want to be added.
Keep in mind, with opt-in settings enabled, it can create a situation where MailChimp can become out of sync with MemberMouse. If the member chooses to simply ignore the confirmation email, they won't be added to Audience list as you expected.
To learn more about how MailChimp handles Double Opt-in, you can read this article here: MailChimp Double Opt-in
Map Membership Levels and Bundles to Audience Lists
Now, you are ready to move onto the next part of email integration where you'll map membership levels and bundles to Audience lists.
- Read this article to learn how to map membership levels to MailChimp Audience Lists
- Read this article to learn how to map bundles to MailChimp Audience Lists
Tag Members In MailChimp Audience Lists Using Bundles
Available in MM 2.4.1+
After setting up the API for MailChimp, there will be an option to Enable Tagging, which needs to be checked to engage this feature. When tagging is enabled, tags will be added and removed from a subscriber in MailChimp when Bundles are added and removed from a member in MemberMouse.![[DELETED CONTENT] Landing Page Critique | MemberMouse](https://storage.googleapis.com/wpgcbucket/wp/2023/08/99429064-4mrsvzsxewvsktltthvh0gus9bfddzyqxa.png)
Once Tagging is enabled, the Bundle Short Name will be tagged to your subscriber within MailChimp when they purchase a free or paid Bundle.
If the Bundle expires or is canceled, the tag will be removed.
NOTE: Bundle tagging only works with the purchase of a paid Bundle or the addition of a free Bundle. Bundle tagging will not work with assigned Bundles.
To understand the difference between assigned and purchased Bundles, please see: Assigned vs Purchased Bundles
 Blog
Blog Podcast
 Support
 Customer Login


