What are Bundles?
Bundles are a secondary method you can use to protect content. They can either be free or paid and just like membership levels, and a paid bundle can have multiple associated products, allowing it to be sold at different price-points.
Unlike membership levels, a member can have an unlimited number of bundles applied to a their account at the same time. This makes bundles suitable for primary offerings sold à la carte, like courses and digital products. They can also serve as add-ons to a paid membership.
When a non-member purchases a bundle, they will be automatically added to the default free membership level. Every member must be assigned to a membership level, and this provides purchasers with the ability to log into your site, without granting access to content protected by other membership levels you may offer.
How to Use Bundles
Using bundles gives you flexibility in how you market and sell your content. For example, say you have a membership site with video training content. Members who sign up for the basic membership will get access to 20 videos. Later, you would like to offer a more specialized course that includes 10 more videos for an additional cost. You could do this by creating a bundle to protect these 10 videos. Then, only members who purchase that bundle can see them. Now you can associate the bundle with a product and offer it as an upsell anywhere on your site. Any member that purchases it will get immediate access to the content.
Managing Bundles
By opening MemberMouse > Product Settings and selecting the Bundles tab, you can create, edit, delete, and perform various other operations on your bundles. For detailed instructions, please consult our Managing Bundles article.
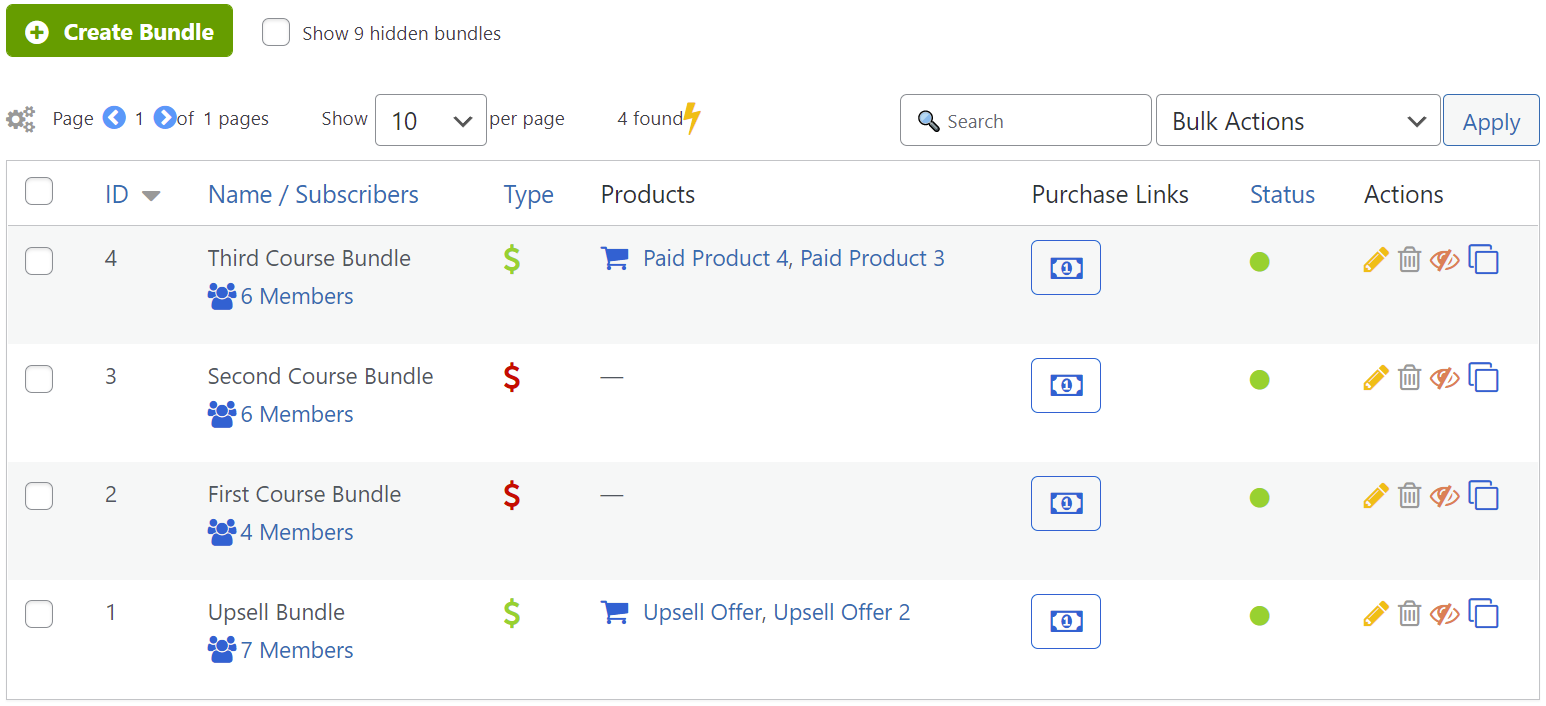
The screen shot below is an example of what the bundles tab will look like. Here you will see all of your bundles, each of their settings, and attributes; including status, type, number of subscribers to each bundle, associated products and purchase links.
Consult the Bundle Options table below to learn more details on each option.
Bundle Options
| COLUMN | DESCRIPTION |
| ID | The ID Number is used internally to indicate the bundle in certain SmartTags™ and SmartWidgets, and in the MemberMouse API. |
| Name/Subscribers | This column shows name of each bundle, and the number of members who are currently subscribed to each bundle. Click on a subscriber's icon, for example, under the name of the membership level for a shortcut to the Manage Members page to view a detailed list of all of the members that have this bundle. |
| Type | The Type indicates whether the bundle is free or paid.  Free Members are not billed for this bundle.  Paid Members pay for products for this bundle. |
| Products | This is where you can see the products that are associated with each bundle. As you create bundles you will link them with products, consequently when a customer buys that product they will be given access to the associated bundle. Learn more in the Products Overview article. |
Purchase Links  | The Purchase Links icon will prompt a dialog box to pop up and give you access to a Purchase Link SmartTag and a Static Link for that particular bundle. When the customer clicks on a purchase link, they are taken to the checkout page where they can purchase the associated bundle. Multiple products can be associated with a bundle in order to offer different pricing options. In that case, you will first be prompted to select the product you want to generate a link for.  |
| Status | The color indicates whether the bundle is active or inactive. (Green) Active – Customers can purchase this bundle. (Red) Inactive – Customers cannot currently purchase this bundle. |
| Actions | The icons under this column allow you to edit, delete or hide a bundle. For more information on these functions, please see our Managing Bundles article.  Edit – Click on the icon to edit the bundle settings  Delete – Click on this icon to delete a bundle. If the icon appears grey, then the bundle is still in use.  Hide – Click on the icon to hide the bundle. At this time, you can also choose to make the bundle inactive, meaning that the bundle cannot be purchased. (Available MM2.4.0+)  Show – Click on the icon to show the bundle. At this time, if the bundle had been inactive, you can also choose to make the bundle active, meaning that it can be purchased. (Available MM2.4.0+)  Duplicate – Click on the icon to create a new bundle using the settings from this bundle. (Available MM2.4.1+) |
 Blog
Blog Podcast
 Support
 Customer Login


