 Blog
Blog Podcast
 Support
 Customer Login
In this article we provide answers to the most common questions customers have when integrating with PayPal:
Which PayPal method is this member using?
- Legacy PayPal members were set up before your site switched to PayPal Checkout. Their payments arrive as IPNs and appear under Logs > PayPal IPN Log.
- PayPal Checkout members bought after PayPal Checkout was activated. Their payments arrive as webhooks. They do not appear in the PayPal IPN Log.
Payment Settings > Migration Status lists every active legacy subscriber by name, under Legacy Subscribers. If the member is not listed there, they are on PayPal Checkout or not on PayPal.
My checkout page shows two PayPal buttons
After the upgrade, legacy PayPal and PayPal Checkout are both active, and the default checkout button SmartTag shows one button for each. They use the same image. The first is legacy PayPal and the second is PayPal Checkout.
To show only PayPal Checkout to new buyers, replace the default button SmartTag with:
<a href="[MM_Form_Button type='submit' paymentMethod='paypal_checkout']">Pay with PayPal</a>The webhook URL shows “Error” when I open it in a browser
This is normal for PayPal Checkout. The legacy IPN URL (x.php?service=paypal) shows “Invalid IPN Notification” when opened in a browser. The PayPal Checkout webhook URL (x.php?service=paypal_checkout) shows only the word Error and returns HTTP status 500. MemberMouse does this on purpose for any request it cannot process, so that PayPal retries failed webhooks.
So opening the PayPal Checkout webhook URL in a browser does not tell you whether webhooks are working. To check delivery, use the webhook Event Logs in your PayPal Developer Dashboard (see below).
PayPal Checkout payments are not activating members, or renewals are not recorded
PayPal Checkout relies on webhooks for renewals, refunds, failed payments and cancellations. One-time payments and the first payment of a subscription are also confirmed when the buyer returns to your site.
Check, in this order:
- The webhook is registered for the right address. In your PayPal Developer Dashboard, open your REST app and look under Webhooks. The URL must be your live
https://address followed by/wp-content/plugins/membermouse/x.php?service=paypal_checkout. If you moved the site to a new domain or switched from http to https, register the new address. - The Webhook ID in MemberMouse matches. Under Payment Settings > PayPal Checkout, the Webhook ID (or Sandbox Webhook ID in test mode) must be the ID of that webhook in the same app. MemberMouse will not activate PayPal Checkout without one.
- Live and Sandbox are not mixed. Live credentials only work with Live webhooks, and Sandbox with Sandbox. Enable Test Mode (Sandbox) must match the credentials you entered.
- PayPal could deliver them. In the Developer Dashboard, open Event Logs and look at recent webhook events. A failed delivery usually means a firewall, security plugin or host is blocking PayPal’s requests to
x.php, or the site is not reachable over https.
In Event Logs > Webhook Events, choose your app under Application, set the dates and click Search.
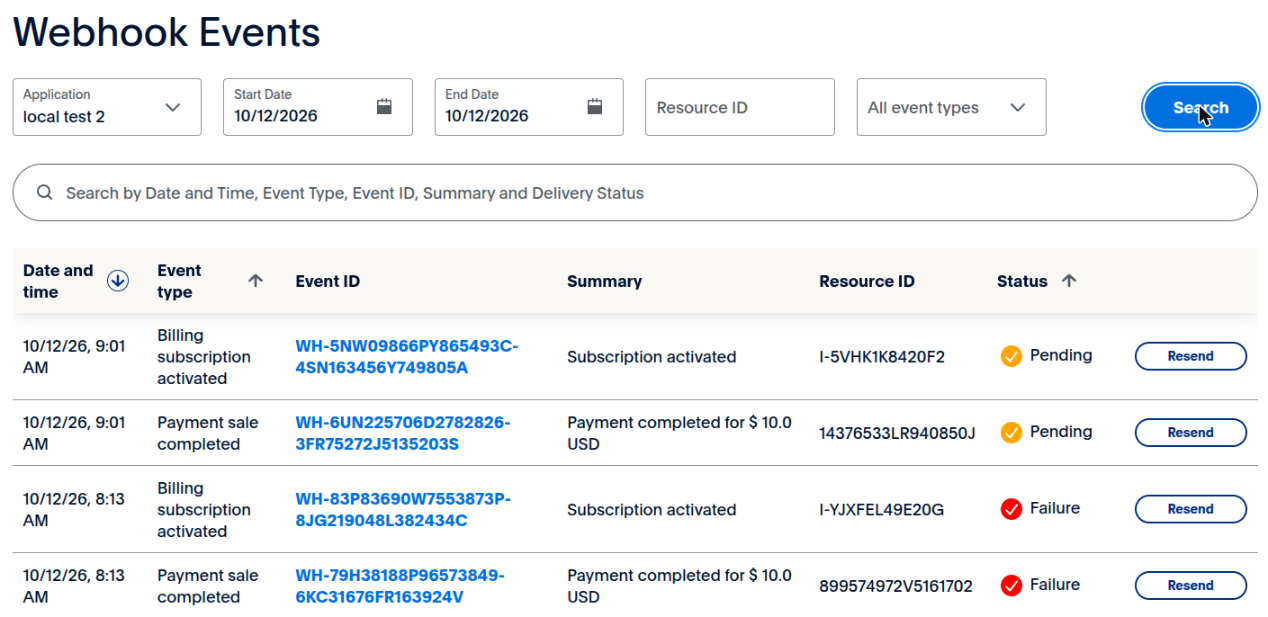
A Failure or Pending status does not always mean your site missed the event. It can happen when the app still has a webhook for an old domain, a staging site or a site that no longer exists, so deliveries to that address fail and PayPal keeps retrying. Delete webhooks you no longer use. (In our testing, events that both test sites received and processed still showed Failure or Pending, most likely because the same app also held a webhook for a site that was offline.)
The Upgrade Wizard’s webhook step shows an http:// address
The wizard registers the address shown on step 5. It is built from your WordPress Address (URL) under Settings > General. If that starts with http://, or uses a staging domain, PayPal will not deliver webhooks there, and the wizard cannot go live. Correct the site address first, then return to step 5.
“Migrated to PayPal Checkout” shows a percentage even though nobody has migrated
The percentage on Payment Settings > Migration Status is active PayPal Checkout subscriptions divided by all active PayPal subscriptions (legacy plus Checkout). New buyers on PayPal Checkout count toward it. It does not measure how many legacy members have switched.
Why are there accounts in Pending Activation status?

When a customer clicks the button on the checkout page to pay with PayPal they are immediately redirected to PayPal’s website to make a payment for what they’re purchasing. At this point, MemberMouse has created an account for this customer and set the status of the account to Pending Activation (accounts in Pending Activation status are indicated by a ‘blue clock’ icon when viewing the Manage Members screen). While the account is in Pending Activation status the customer will not be able to login or access protected content.
The account will remain in Pending Activation status until the customer has successfully completed the purchase on PayPal. Once confirmation of the payment has been received by MemberMouse, the account will be put into Active status.
So an account in Pending Activation status simply means that the customer clicked to checkout via PayPal but never completed the purchase. If the customer made a payment and their account has not been activated, see the Accounts are not being activated section of this article for further troubleshooting steps.
PayPal button is not being displayed on the Checkout page
This is a CSS styling issue and can be easily resolved as follows:
Use the MemberMouse PayPal Button
The default MemberMouse Checkout page uses the following SmartTag™ to output payment buttons:
[MM_Form_Button type='all' label='Submit Order' color='orange']
When the Checkout page is rendered, this SmartTag™ outputs the PayPal button as follows:
<a href="javascript:mmjs.checkoutx('PAYPAL', true);" class="mm-paypalCheckoutBtn"></a>
Notice that the CSS class is set to ‘mm-paypalCheckoutBtn’.
In order for the PayPal button to be displayed on the screen, the MemberMouse CSS needs to be loaded on the page. In order for that to happen, you need to ensure that the Checkout & Redeem Gift item is checked in your Core Page CSS Settings. Read this article to learn how to change your core page CSS settings.
Use a Custom PayPal Button
If you want to customize how the PayPal button should look on your Checkout page, you’ll need to use the following on your Checkout page:
<a href="[MM_Form_Button type='submit' paymentMethod='paypal']">Pay with PayPal</a>
Now you can style the button any way that you’d like and even use the MemberMouse button styles.
Once you’ve added that to your Checkout page, you can safely remove the default SmartTag™ for outputting payment buttons:
[MM_Form_Button type='all' label='Submit Order' color='orange']
Accounts are not being activated even after a payment was made
In order for anything to happen in MemberMouse as a result of something that happens on PayPal (i.e. a payment), PayPal instant push notifications (IPNs) are used. So if there’s a problem with MemberMouse being updated as a result of something happening on PayPal this means there are problems with the IPNs.
This is usually the result of one of the following:
IPN Configured Incorrectly
The first thing to check is that you have the IPN configured correctly in PayPal. Here are the steps for configuring the PayPal IPN.
IPNs Being Blocked
After you’ve confirmed that your IPN is configured correctly in PayPal, perform the following steps to find out where the problem is:
- On your Payment Settings > Payment Methods screen in MemberMouse, make sure that PayPal is not in Test Mode.
- Create a PayPal test product in MemberMouse. You can make it a one-time purchase product for $.05 (you’ll be purchasing this product so you don’t want it to be too expensive).
- Copy the static purchase link for the new PayPal test product.
- Go to a browser where you’re not logged into your WordPress/MemberMouse site as an administrator and paste in the purchase link.
- Click the PayPal button to checkout using PayPal and complete the purchase on PayPal.
- Log into PayPal and go to the IPN History page. You should see the IPN relating to the purchase you just made at the top of the list with a status of ‘Sent’.
- If the IPN doesn’t show up in the list then check your IPN configuration and specifically ensure that you have IPNs enabled.
- If the IPN shows up but the status is ‘Failed’ then you’ll want to reach out to your hosting provider to understand why IPNs from PayPal are being blocked.
- If the IPN doesn’t show up in the list then check your IPN configuration and specifically ensure that you have IPNs enabled.
- If the IPN in the PayPal IPN History log had a status of ‘Sent’, log into your WordPress/MemberMouse site and go to Logs > PayPal IPN Log. At (or near) the top of the list you should see the IPN logged from your test transaction.
- If the IPN doesn’t show up in the list then you likely have caching affecting your site. Just disabling a caching plugin won’t necessarily disable caching. Your hosting provider could also use server side caching. Read this article to learn about configuring caching with MemberMouse.
- After Configuring Caching on Your Server, install a fresh copy of the MemberMouse plugin, which can be downloaded here, and then run a test PayPal transaction again to see if the issue is resolved.
- If the IPN shows up but the associated account is still Pending Activation in MemberMouse then you’ll want to reach out to the MemberMouse customer success team for further assistance. When you do this, please provide a screencast video that demonstrates you going through the 7 steps listed here and WordPress admin credentials.
- If the IPN doesn’t show up in the list then you likely have caching affecting your site. Just disabling a caching plugin won’t necessarily disable caching. Your hosting provider could also use server side caching. Read this article to learn about configuring caching with MemberMouse.

 EN
EN  ES
ES  DE
DE  FR
FR  PT
PT 


