 Blog
Blog Podcast
 Support
 Customer Login
Migration Guide
- 1 Things to Consider Before Migrating
- 2 Coming From Another Membership Solution
- 3 Importing existing WordPress users
- 4 Frequently Asked Questions
Things to Consider Before Migrating
After deciding on making MemberMouse your new membership solution, there are still some things to consider. Though this may not offer a complete list of ideas for your specific needs, this section of the guide includes some important steps that will help you as you move forward with your migration.
Coming From Another Membership Solution
I. Create a Membership Level (or Levels, as needed)
Before you import, create a new membership level, which is going to be a legacy version of your active levels. Call it ‘Legacy’ or whatever you like, and since it is just for the import, you will not even need a product. It should have the same content access, etc, as your existing level, but this ‘Legacy’ membership level will be set to expire. The expiration period is the length of your billing cycle (i.e. 1 week, 1 month).
If you have different membership levels with different access, then create one Legacy level for each (Legacy A, Legacy B, etc.)
1. In the MemberMouse menu, go to Product Settings and click on the Membership Levels tab.
2. Click ‘Create Membership Level’.
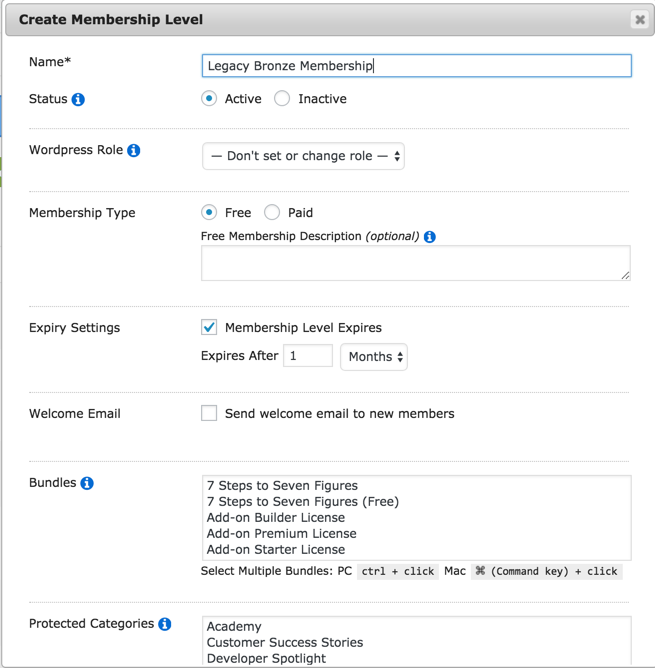
3. A dialog box will pop up containing all of the options available for configuring the membership level. The following steps will show you what to choose for each available option. However, if you’d like to learn more, you can consult the Membership Level Options table.
4. Set the name of the Membership Level as “Legacy [name of original membership level]”. For example, Legacy Bronze Membership.
5. Set the Status as ‘Active’.
6. For WordPress role, keep it as ‘Don’t Set or Change Role’.
7. Set the Membership Type as ‘Free’. Even if this is usually a paid membership level, you will not be using this legacy level for billing purposes.
8.Click the checkbox next to ‘Membership Level Expires’. Choose the length of time that’s equivalent to one of your billing cycles. For this example, choose ‘1 month’.
9. The ‘Send a Welcome Email to New Members’ is checked by default. A sample email is already filled out for you, and you can customize this however you’d like. This article provides more details about creating a welcome email.
If you do not wish to send an email upon import, you can uncheck this box.
Note: You are also given the option to bypass the welcome email in the Import Wizard settings.
10. If you have created bundles, choose any bundles that you’d like these legacy members to have access to while on this expiring membership level.
11. Click on ‘Save Membership Level’.
Here’s what your Membership Level configuration will look like…
To instruct MemberMouse to hide the WordPress admin bar from new members, go to General Settings > Other Settings. In the WordPress User Options section, check the check box next to ‘Hide the admin bar for new members’.
If you leave the box unchecked whether or not the admin bar will be shown to new members will be based on settings in WordPress or another plugin.
III. Transfer Billing
A. Create a push notification.
Create a push notification that triggers an email to be sent to the customer when the Legacy membership expires.
1. From the WordPress Dashboard, go to MemberMouse > Developer Tools and then click on the Push Notifications tab.
2. Click the ‘Create Push Notifications’ button and a dialog will pop up where you’ll configure the email notification.
3. Make sure that Status is set to ‘Active’.
4. Under the When the following event occurs… heading, select ‘Membership Status Changed’ from the drop down.
5. After selecting this another section will show up. Under the When membership level is… heading, you can select your Legacy level to indicate that this notification should be triggered only by that membership level.
6. Under the When membership status is… heading, you can select ‘Expired’.
B. Create an email to send to your customer.
1. Under the Perform the following action… heading, select ‘Send Email’ from the drop down.
2. Select ‘Current Member’ next to the To: label indicating that the notification email should be sent to the customer.
3. Choose who the email is sent from by selecting an employee from the dropdown next to the From: label. This dropdown contains all of the employee accounts currently created in the MemberMouse system. Learn more about Employee Accounts.
If you would like additional recipients to be notified, you can add them next to the cc: label by adding the email addresses, using commas to separate multiple email addresses.
4. In the email, you will let your customer know that the level expired and ask them to re-sign up by including a purchase link for their equivalent, non-expiring membership level in MemberMouse. You can even put in some special copy explaining your site migration. The customer can choose to use their existing username and password (Recommended) or create a new username and password. You can find a sample version of this email, in the FAQs section of this guide.
5. Click the ‘Save Push Notification’ button.
C. How to look up a purchase link for your email.
1. In the MemberMouse menu go to Product Settings, and click on the ‘Products’ tab.
2. In the Purchase Links column, click on the ![]() button next to the item you would like to generate a purchase link for.
button next to the item you would like to generate a purchase link for.
3. The following Purchase Links dialog box will pop up:
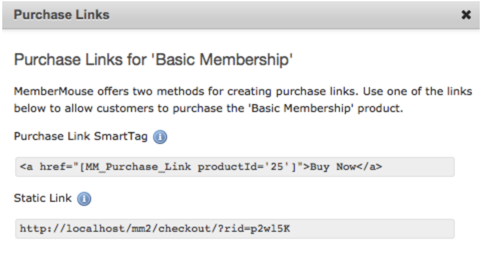
4. The Purchase Link SmartTag is one of several SmartTags that can be included in an email created as part of a push notification. Copy and paste the Purchase Link SmartTag.
D. Billing is Re-established.
Once your members click on the Purchase Link in the email, they will be taken to the dynamic Checkout core page on your site. Here they’ll fill out billing information and re-purchase their membership via MemberMouse. The connection between MemberMouse and the payment gateway is established, and MemberMouse will take care of recurring billing.
You will need to manually cancel any active subscription for the customer that you have in your current billing system at this point.
Importing existing WordPress users
If you already have a WordPress site but haven’t been using a membership solution prior to MemberMouse, then your current members may already exist as WordPress users in the database. If this is the case, you can easily migrate these users into MemberMouse by using the Import Wizard. Just create an import file that contains the email addresses of the users to migrate and run the import wizard. Importing is done on a per membership level basis. Users will not be able to access the member pages until imported to MemberMouse.
The Import Wizard acts as an updater. Any information already in WordPress will be used for the new member, so to import an existing user, all that is needed is an email address. If you do enter a password into the import file for an existing user, it will be ignored.
Frequently Asked Questions
1. Is there a way to transfer the billing automatically for the customer?
No. There are two possible ways to get your legacy customers switched over from your current billing system to having MemberMouse be in charge of billing. One is described in detail in the “Coming From Another Membership Solution” section of this guide under the Transfer Billing heading. A second method is to set up a system of watching these accounts, whether manually or automatically via a custom script or push notification, and keep a lookout for natural billing events (i.e. upcoming rebills, card declines, etc). When these events arise you can reach out to the customer, provide them with a MemberMouse purchase link and suggest that they use that link to update their subscription.
Once they start billing on MemberMouse, you’ll need to manually cancel any active subscription they have in your current billing system.
2. Can I migrate the payment vendor accounts from my old membership plugin to MemberMouse?
Yes. If you are using another membership plugin and you have existing accounts with payment vendors, you can use those same accounts with MemberMouse. However… you will need to be aware of the way that an integration with a payment vendor works, because while you can use the same account, your members’ billing information cannot be transferred.
When you configure your MemberMouse site to work with a payment vendor, you are establishing a two way connection between your site and that vendor. The key to that connection is a transaction ID that is created by MemberMouse for every transaction. It is this unique transaction ID that MemberMouse transmits to your payment vendor along with the member’s payment details and billing instructions. Inversely, when a successful payment is received to the vendor, it transmits back to MemberMouse that confirmation, using the transaction ID to specific what the payment was for.
When you migrate your users over from another membership plugin, the one thing that MemberMouse cannot do is capture the transaction IDs used by your previous plugin. In the Import Wizard template, you are setting each member up with specific settings; what products they have, what membership level they have, etc. But because those purchased did not originate within MemberMouse, there is no transaction ID associated with them.
The only time this is relevant is when a member, who has a recurring billing product, attempts to cancel their account or subscription, or if a payment is missed. If a customer cancels their account in MemberMouse on a product that was purchased initially via MemberMouse, MemberMouse will transmit to your payment vendor a request to cancel any recurring billing for that member associated with that specific transaction ID. Because that ID exists within the payment vendor, then the billing is canceled. But for imported members, there is no transaction ID, and thus no way for MemberMouse to tell your vendor to cancel. The same is true in reverse order, if a member cancels any billing via their payment account (usually this happens only in PayPal), then the payment vendor will transmit back to MemberMouse a request to cancel and a transaction ID, which does not exist in MemberMouse, and thus no action is taken. The same action takes place on missed payment (say if a member cancels their PayPal account, or there are insufficient funds).
3. How can I change the URL associated with my license?
This information applies if the only thing that’s changing is your URL. If you’re looking to migrate your current MemberMouse site to another server in addition to changing the URL then refer to our article: Migrating MemberMouse to a New Server.
In order to change the authorized URL associated with your MemberMouse license, we recommend following these steps below:
1. Put your site into maintenance mode.
2. Deactivate the MemberMouse plugin.
3. Log into membermouse.com and go to the Member Dashboard. Click on ‘My Account’ in the menu sidebar on the left side of the page.
4. Once on the My Account page you’ll see the License Management section. Click on the ‘Edit’ button. This will make the URL field editable.
5. In the ‘Authorized URL’ field, enter the URL for your new WordPress site. It’s important that the URL you enter matches the URL of your WordPress site exactly. The best way to ensure that you’re entering in the URL correctly is to log into your WordPress site, go to the General Settings page and copy the ‘WordPress Address (URL)’.

6. Once you’ve entered in your URL, click on the ‘Save’ button to save it. You should see a message informing you that the license was updated successfully. At this point you’ll be able to activate the MemberMouse plugin on your WordPress site.
7. Reactivate the MemberMouse plugin.
8. Take your site out of maintenance mode.
There are additional considerations for changing the URL in WordPress and/or if you have PayPal configured on your site.
4. Do you offer staging or development licenses?
Yes. Professional web developers often use staging environments when creating and updating websites. Staging environments allow multiple developers to work together, and project managers to proof changes and finalize a project before rolling it out to a production server. A staging environment is sometimes called a sandbox and is the preferred method of streamlining workflow for most web professionals.
All MemberMouse accounts come with a complimentary staging license. Our staging licenses cannot be used for commercial purposes and are limited to 100 members. There is no ability for recurring billing. Other than that, they have no restrictions. Just let us know what the WordPress Site URL is on your staging site and we’ll set up the license for that URL. If you’re developing locally, make sure it’s not just http://localhost. It should be something that will be unique across all customers like http://localhost/yoursitename.
Steps to request a staging license:
1. Submit a ticket to the MemberMouse Customer Success Team and select ‘Staging License Request’ from the dropdown menu “What is this about?”.
2. In the body of your request please provide:
- the email address associated with your account on membermouse.com
- whether the staging license is for a local development environment or a publicly accessible one
- the URL of the WordPress site you’re using as your staging environment
5. Can you provide a sample of the expiring level email to send to customers?
Here is a sample of what the email could contain including the appropriate MemberMouse SmartTags. Note that the you have to replace the purchase link in this sample with the one for your own product.
Subject: Action Required: Your Account
Body:
Hi [MM_Member_Data name=’firstName’],Your subscription has expired. And since we have recently migrated our site, we also have a new billing provider. You must purchase a new subscription to keep your subscription active.
Once you enter your information with our new, improved billing provider, your account will be automatically renewed next time, conveniently. You’ll also be able to more easily manage your subscription.
<a href=”[MM_Purchase_Link productId=’8’]”>Buy Now</a>
If you have any questions, feel free to contact us at
<a href=”mailto:[MM_Employee_Data name=’email’]”>
[MM_Employee_Data name=’email’]</a>.Thanks!
[MM_Employee_Data name=’displayName’]
6. Can MemberMouse migrate my site?
No, but… Our Customer Success Team is available via email at [email protected], Monday – Friday 9AM – 5PM Eastern Time to answer all of your questions during this process. You can also submit a ticket from our Support Center where you’ll have access to an extensive Knowledge Base of articles and videos.
If you are interested in hiring an experienced contractor to migrate your site and configure MemberMouse, we have a listing of recommended qualified contractors with descriptions of their services and contact information in our Support Center. This link will take you directly there.


